
We want you to have all the necessary information to understand the world of photography. We will approach in depth the lighting and all the elements that are part of it.
Lighting is one of the biggest challenges that every photographer face, whether you are learning or even if you have spent time dedicating yourself to photography, without light there is no good photograph. You must know how to handle it since it is essential.
Now, we will explain each element of light, how to make good use of it and the power it has as a compositional element within a photograph.
Many times, in the workshops, the big question that everyone worries and few know how to answer arises. What’s up with the light? What is your relationship with photography? How can I improve my shots? The fundamental key of photography is knowing how to see the light.
Nothing makes sense without light. The style of photographers is often defined by the way they capture light. For the search without return of an illumination that becomes the hallmark of the house and makes us recognize it.
If you need a photographer based in Sydney, here at Roman Wolczack’s studio you’ll be able to have the photos you always wanted. It doesn’t matter if you want a professional commercial photo session.
Natural and artificial light
It is important that you know some concepts. We will start with the basic elements, natural light and artificial light.
Natural light is one that you cannot control thanks to all its qualities, this is because its main source is the sun, the moon or the stars. The light coming from these elements, you cannot modify or adjust or intensity, direction, quality or colour.
On the other hand, is artificial light, in this if you have control over it and you can modify it at your whim. You can change the position, lower the intensity, adjust the colours … The artificial light comes from the flash or from the bulbs. However, this is usually more expensive and a little more uncomfortable to use.
Factors that define illumination
- The origin
- The number of light sources
- Diffusion
- Duration
- Intensity
- Colour
- Direction of light (has different classifications)
Aspects that help you in the composition of your image
- Quality: is the relationship between the size of the light source and the subject or object that we are photographing. Within the quality, a classification can be made between:
- Hard light: is that which occurs when the light source is smaller than the object to be photographed. It can generate contrasts and shadows a little more intense.
- Soft light: it is the one that occurs when the light source is bigger than the object or the subject that we are going to photograph. This type of light is a bit imprecise because the transition of lights and shadows is more subtle.
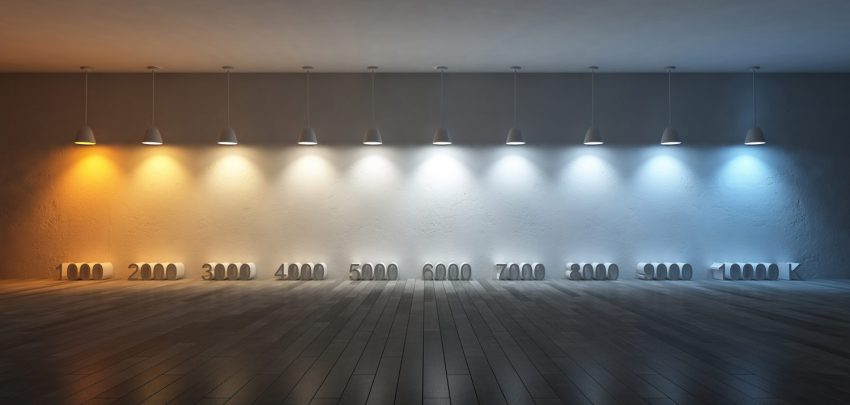
- The temperature of the colour: the colour and the warmth of the photo can vary, depending on how you use it.
- Directionality: is the angle where the light is to the object or the subject to be photographed. The direction of the light is decisive as you can highlight aspects or details and even hide some elements that have no relevance to the photograph.
Within the directionality of light are 7 general directions and are divided as follows:
- Front light: it is the one that produces a flattening of the objects, increases the details, but cancels the texture. However, this type of lighting gives the colours a high level of brightness.
- Side lighting: this lighting highlights the texture, emphasizes the volume and depth of three-dimensional objects. But the information level of the details, is much smaller than the frontal light.
And on the other hand:
- Main light: it is the main light of the photo, it is the most intense of the image and it is usually the most important. The main light or guiding light is responsible for clarity.
- Fill light: it is used to complement the areas that remain in the shade, its power is usually lower than the main light. It is usually a secondary light and serves to reduce the contrast.
- Backlight: may have several functions, is generally used to illuminate uniformly or to cause degradation.
- Effect light: it is a point light, highlights specific parts of the object or subject, and softens the main effect of the image when it is projected.
- Backlight: this serves to model the figures and adds a three-dimensional touch in the photograph.
Tricks and tips to improve lighting
Once controlled the basic concepts of lighting as a tool in photography. We will provide some tips and tricks when it comes to capturing your image.
ISO sensitivity: ISO sensitivity will depend on the degree of illumination. When there is a very intense lighting, we recommend using the low you can.
Take into account the white balance: it is responsible for correcting or adjusting any colour defect towards warm or cold tones.
Play with the direction of light: as we have already discussed the different lighting directions that exist. You can try experimenting with them and have incredible results.
It dominates well the opening of the diaphragm: since the best way to control the light, is through it. If the opening of the diaphragm is open, you will let more light pass, but if it is a little more closed, you will not let much light go by.
Spot metering mode: when working with low light it becomes a bit more complicated to make the measurements. One way to solve it is by placing the point measurement mode, so you can measure what you want in specific.
Adjust the white balance: the ideal is to adjust and place it to your liking and preference before taking the picture, taking into account the light, the environment and other elements.
If you need a professional photo session, Roman Wolczak’s studio is the place where you’ll find top quality equipment used by a qualified photographer with years of experience in these services.